cmka1h39t00041opjelu825lh • 1K
Ship Tavern
Description
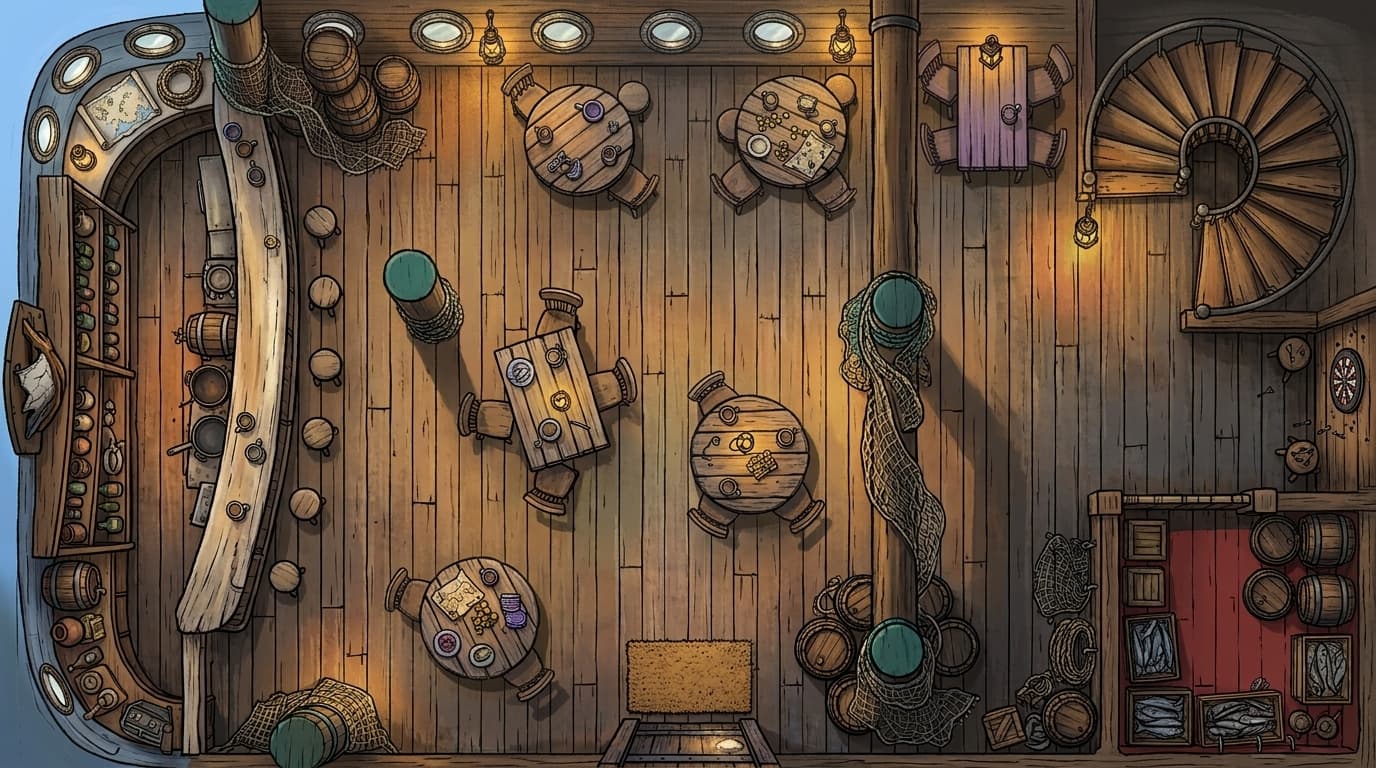
The Salted Anchor — Interior Description (precise layout) Orient the map with the entrance at the bottom edge — that's the only way in or out at ground level, a heavy door that sticks a little before it gives. Everything else in the room is arranged around that fixed point. The bar runs the full length of the left-hand wall, from close to the entrance corner up toward the top-left. This is the oldest surviving section of the original hull, and it's the one part of the room that reads as "finished" rather than converted — a long wooden counter worn pale in a path where years of elbows have rested, with a curved plank-seam still visible in the wood behind it, unmistakably hull rather than milled beam. A row of intact portholes runs along this same left wall above the bar, doing actual duty as windows. The wall behind the bar holds shelving, kegs on tap, and whatever Renna's cooking that day. In the top-right corner, a spiral staircase climbs up to the guest rooms above — ascending, tightly wound, clearly a later addition rather than anything original to the ship (a straight staircase wouldn't have fit the hull's curve, so someone built up rather than across). It's a natural chokepoint: one person at a time, narrow, easy to watch or easy to get isolated on depending on which side of a fight you're on. The bottom-right corner is a storeroom — walled off from the rest of the common room, not open like everywhere else. This is where the bulk of the tavern's barrels actually live: stacked kegs, spare fishing net coiled and hung on hooks, crates of supplies, anything not currently in active use out on the floor. A door or low gate separates it from the main room rather than leaving it fully open — Renna's domain more than the guests', though an unlocked or unwatched storeroom is exactly the kind of detail that matters if the party ever needs to duck out of sight or go looking for something. Everything else — the whole central and right-of-center span between the bar, the staircase, and the storeroom — is open common-room floor, and this is where the room's genuine clutter lives. Tables are scattered throughout this entire main area, none of them matching: plain rectangular ones built from plank offcuts standing next to round ones repurposed from old barrel tops, all a little rickety, all sturdy despite it. Between and around the tables, more barrels (fewer than the storeroom, but enough to weave around) and loose coils of fishing net draped over the room's support pillars, which stand at intervals throughout this whole open area — thick, load-bearing, marking where the original ship's ribs and bulkheads used to brace against open water. A dartboard, missing half its numbers, hangs slightly crooked on the wall nearest the staircase. Lighting throughout is warm, uneven, lantern-based rather than bright — long shadows thrown between the pillars, more pronounced the farther you get from the bar's brighter corner. The floor carries a faint permanent tilt, most noticeable if you're moving fast across the open common-room span rather than standing still at the bar.
Sign in to add this map to your collection.


